Hi Everyone!
I do not normally blog on Wednesdays, but I just wanted you to know that we have had 3 different features in the last week! In case you missed any of them...check them out! Thank you to all the great vendors that I work with to make these parties FABULOUS!!! Check them out...you will love them all!
http://pizzazzerie.com/parties/host-a-2011-oscars-party-desserts/
http://birdcrafts.blogspot.com/2011/02/real-parties-ice-cream-sunday-party.html
http://justcallmemarthaa.blogspot.com/2011/02/wine-and-cheese-themed-table-guest.html
YEAH!!! Thank you so much for all your support. I am working hard and have some great parties coming up!
Nite,
Serena
Wednesday, February 23, 2011
Tuesday, February 22, 2011
Favorite Vendors - Pig Castle
As you know, I like to introduce you, or reintroduce you to some of my favorite people to work with for my parties and shoots. I met Miss Mary on ETSY. She had recently moved to the same state and me and we have become fast friends. She has twins that are one, that I literally want to steal, sneak a peek at the photo shoot of her kiddos that I helped with. She also has an amazing paper goods and supplies company on ETSY. Pig Castle is a name that you can not remember and you will not want to when you see all that she can make!
Ok..take a look.
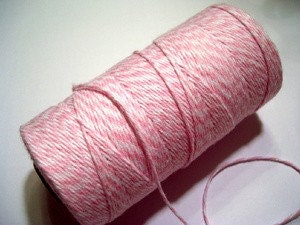
Twine in a million colors, this one screams me! Hot Hot Pink!
And of course she has made a lot of the custom signs and cards you have seen on my party tables....Remember these????


Anywho, I could go on and on, but please check her out. She is always welcoming to custom projects and is just a doll to work with!!!
Find her ETSY page here! http://www.etsy.com/shop/PigCastle?ref=seller_info
Her Facebook here! http://www.facebook.com/home.php#!/pages/PigCastle/166231370061148
Enjoy your nite guys!
Serena
Ok..take a look.
Twine in a million colors, this one screams me! Hot Hot Pink!
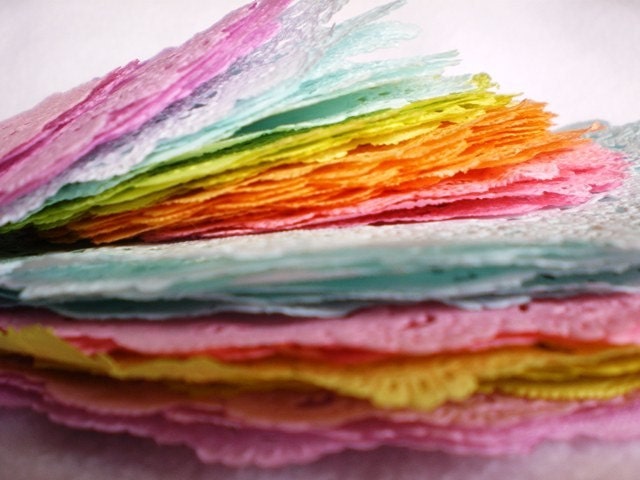
Bright custom colored dolies ( Which I am using in an upcoming shoot :) )
And of course she has made a lot of the custom signs and cards you have seen on my party tables....Remember these????


Anywho, I could go on and on, but please check her out. She is always welcoming to custom projects and is just a doll to work with!!!
Find her ETSY page here! http://www.etsy.com/shop/PigCastle?ref=seller_info
Her Facebook here! http://www.facebook.com/home.php#!/pages/PigCastle/166231370061148
Enjoy your nite guys!
Serena
Thursday, February 17, 2011
DIY Thursday - Chalkboards!
Hi Everyone!
I am completely obsessed with a new blog, well new to me! Sparkle and Hay is a wedding blog that likes to focus on rustic themed events. She also has some AMAZING DIY projects that I asked to share and she said YES!
I especially loved this project. You could do it in many shapes and sizes and for various uses. OK...enough talking, more sharing!

1) Mix the paint. WELL. Cannot stress this enough - the thicker the better (and the less coats you will have to do, I did have to do 2-3 coats on some earlier test pieces)
2) Be ready to get a bit messy. Cover the surface space you are working on with newsprint or paper, remember you are painting here, and will be holding the piece, but often times dripping will occur.
3) Evenly paint the wooden shape - brush out any bubbles. Let the piece set and dry for about 30 minutes (so it is dry to the touch).
4) Paint edges and re-coat top layer (if needed) or flip and paint other side (if you want two sided) but be sure to always have 1 side dry enough to put it down on the paper. If you place a wet side down the paper will stick and when you lift the finished shape up it will have shreds of paper on it (not pretty).
And that's really it! Add whatever fastener you want - in this case a hot glue gun was used to attach one of the mini clothespins. Note: tacky glue or super glue works just as well.

Suzanna March Photography helped her with these awesome photos!
So cute huh? I think I could use them as place cards, you could use them for decor, welcome signs, table cards ( to label the food and such) and so many other uses. There are so many great ideas over on Sparkle and Hay, please check her out! I love her blog!
Nite Everyone!
Serena
Tuesday, February 15, 2011
My Parties - Ice Cream Sundae Party!!!
Hi Everyone!
I recently had the honor of hosting a "Split" party. It was a party that was Ice Cream Banana Split Party! Yummy huh?!?!?! I loved all the accent pieces on this table. Ok...picture time!

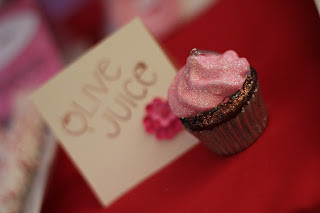
I simply ADORE the cupcake toppers that Lynlee Petite Cakes makes. I have used her amazing cupcake toppers on my Wine and Cheese party and also at my Paris shoot ( upcoming :))


All the candy was pastel colored, but I was able to find candies that are actually called Banana Splits!!!
 Miss Mary at Pig Castle did an awesome job on this banner. She makes amazing custom banners and she sells all different colors of twine! She even made the glittered clips!

 Creative Flair Art made me this custom photo frame. I used it to frame the invitation. I love the 3-d elements and the colors matched perfectly!
 Do you recognize these adorable cake pops? The same lovely lady that made them for me for the Wine and Cheese party made me these awesome and yummy cake pops. Thank you Boxed Pops!


OK, you know that I love Jaime Mancilla and her amazing buntings! I am so thankful that she makes these fully custom and amazing flag buntings!


 I even found candy bars that were ice cream sundae flavored!!! You have to love Godiva!


Oh I hope that you love love love it as much as I do! Please click on the links and visit the amazing vendors that made my table amazing and delish!
Nite nite!
Serena
I recently had the honor of hosting a "Split" party. It was a party that was Ice Cream Banana Split Party! Yummy huh?!?!?! I loved all the accent pieces on this table. Ok...picture time!

I simply ADORE the cupcake toppers that Lynlee Petite Cakes makes. I have used her amazing cupcake toppers on my Wine and Cheese party and also at my Paris shoot ( upcoming :))


Lisa and Ira at The Cookie Jar always take my crazy challenge of themes for cookies. They are so amazing and so friendly and Lisa is so so so talented.


All the candy was pastel colored, but I was able to find candies that are actually called Banana Splits!!!


OK, you know that I love Jaime Mancilla and her amazing buntings! I am so thankful that she makes these fully custom and amazing flag buntings!


Oh I hope that you love love love it as much as I do! Please click on the links and visit the amazing vendors that made my table amazing and delish!
Nite nite!
Serena
Sunday, February 13, 2011
Sunday Supper - Valentine's Fondue
Hi Everyone!
What could be romantic that hot, warm, delish fondue. You can have it for dinner or dessert, or for BOTH! Here is a great recipe for cheese fondue. Dip it with bread, meat, fruit whatever you would like. Enjoy! The best part of this recipe is that there is champange in it! How appropriate for Valentine's Day!

Enjoy!
Serena
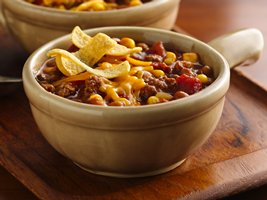
Image from goodle images - click for an additional recipe
Read more: http://www.food.com/recipe/three-cheese-fondue-with-champagne-45182#ixzz1Du5NdSyq
What could be romantic that hot, warm, delish fondue. You can have it for dinner or dessert, or for BOTH! Here is a great recipe for cheese fondue. Dip it with bread, meat, fruit whatever you would like. Enjoy! The best part of this recipe is that there is champange in it! How appropriate for Valentine's Day!

- 4 teaspoons of cornstarch
- 1 tablespoon fresh lemon juice
- 1 1/4 cups dry champagne (brut)
- 1 large shallot, chopped
- 2 cups coarsely grated gruyere cheese (about 7 ounces)
- 1 1/3 cups coarsely grated emmenthaler cheese (about 5 ounces)
- 1/2 cup diced rindlessbrie cheese or 1/2 cup camembert cheese (about 3 ounces)
- 1 pinch ground nutmeg
- 1 pinch white pepper
- 1 french-bread baguette, crust left on,bread cut into 1 inch cubes
Directions:
Prep Time: 15 mins
Total Time: 30 mins
- Stir cornstarch and lemon juice in small bowl until cornstarch dissolves; set aside.
- Combine Champagne and shallot in fondue pot or heavy medium saucepan; simmer over medium heat 2 minutes.
- Remove pot from heat.
- Add all cheeses and stir to combine.
- Stir in cornstarch mixture.
- Return fondue pot to medium heat and stir until cheeses are melted and smooth and fondue thickens and boils, about 12 minutes.
- Season fondue with nutmeg and white pepper.
- Place over candle or canned heat burner to keep warm.
- Serve with bread cubes.
Serena
Image from goodle images - click for an additional recipe
Read more: http://www.food.com/recipe/three-cheese-fondue-with-champagne-45182#ixzz1Du5NdSyq
Thursday, February 10, 2011
DIY - Second round for the week!!!
Since it is the week before Valentine's Day, I figured that 2 DIY sessions with Valentine's Day in mind would be a good idea. Since I focused on kids Tuesday, I wanted to think of crafts that could be used for around the house. I loved this wreath!!! It is such a different spin on a traditional wreath and very simple too!

This fun puffy heart craft project is perfect for the classroom setting. Few supplies are needed and it can be altered for younger age groups.
Be sure to try more of our Valentine crafts and our other Valentine’s Day activitiy ideas.
Enjoy!
Serena
This fun puffy heart craft project is perfect for the classroom setting. Few supplies are needed and it can be altered for younger age groups.
Be sure to try more of our Valentine crafts and our other Valentine’s Day activitiy ideas.
What you'll need:
- Pink and white tissue paper, cut into 1” squares
- White craft glue
- Scissors
- Piece of card stock or construction paper
- Pencil with an eraser
How to make it:
- Cut out a heart shape from the construction paper or card stock.
- Put white craft glue into the center of the heart, shaped like a heart.
- Using the eraser end of a pencil, place the eraser into the center of a white tissue paper square. Twist the tissue paper square around the eraser and dot it onto the glue. Continue this process until entire middle of the heart is covered with white tissue paper. See photo.
- Repeat the process from step #3 with pink tissue paper for the border of the heart.
- Glue a hanger to the back if you like.
Tips:
- For younger kids who have trouble working the pencil steps, allow them to wad up the tissue paper squares and press them directly onto the glue with their fingers.
- Instead of a hanger, try gluing a magnet strip to the back and hang on your fridge!
- Always saved the tissue paper from birthday gifts for craft projects like these.
Enjoy!
Serena
Tuesday, February 8, 2011
Valentine's DIY Crafts!
I came across these and thought that they would be a perfect addition to your child's classroom parties!!! These would be great if you want a different option to candy to pass out.
Just like their edible cousins, these foam conversation hearts will let your child get right to the point of her Valentine's messages.
- Materials
- Scissors
- Craft foam
- Permanent markers
- Pipe cleaner
- Pencil

- Instructions
- Cut a 1- to 2-inch heart from craft foam. With a permanent marker, print a short message on the front and the name of the giver on back.
- Now poke an inch of the pipe cleaner through the bottom of the heart, bend it down, and twist it back around the remaining length of pipe cleaner.
- Coil the pipe cleaner tightly around the pencil. Then gently pull up on the heart so that part of the coil bobs freely above the pencil, with several loops anchored around the eraser end.
And here is one that had candy in it!

Here, two classic Valentine's Day gifts — flowers and candy — combine to make one sweet treat.
- Materials
- Scrapbooking paper or card stock
- Scissors
- Lollipops
- Tape
Instructions
- For each, cut three heart-shaped petals, two leaves, and two flower centers from scrapbooking paper or card stock.
- Poke a small hole in each, crease the petals as shown, and slide the pieces onto a lollipop stem. Tape the bottom to secure.
More messages:
You're a sweet heart
Our friendship is blooming
Be my bud-dy
I loved these and alot of other postings on Family Fun. Check it all out!!!
Enjoy!
Serena
Sunday, February 6, 2011
Sunday Supper! Barbeque Chili
If you are like many people, after the Super Bowl, you have lots of left over food. I usually have chicken, pork or beef left over from a recipe for the game. This is a recipe that needs things that are usually in the pantry ( YES!) and some left over ground beef. If you do not have any of that, it is easy enough to whip up. It also would go great with the cornbread that I posted on my Facebook this week from Elizabeth Ann's Recipe Box ( Delish!)
OK here you go!
Thank you Betty Crocker for this recipe.
Hope you enjoyed the game! I can not believe the weekend is already over. I did love the commericials though :)
Nite,
Serena
OK here you go!
| 1 | lb lean (at least 80%) ground beef |
| 1 | large onion, chopped (1 cup) |
| 1 | can (22 oz) southern pit barbecue grilling beans, undrained |
| 1 | can (14.5 oz) Muir Glen® organic fire roasted diced tomatoes, undrained |
| 1 | can (8 oz) tomato sauce |
| 1 | box (9 oz) Green Giant® Simply Steam® Niblets® frozen corn |
| 1 | tablespoon chili powder |
| 1 | teaspoon ground cumin |
| 1/2 | cup shredded Cheddar cheese (2 oz) |
| 2 | cups corn chips |
| Print these coupons... | ||||||
| About Concordance™ | ||||||
- In heavy 3-quart saucepan, cook beef and onion over medium-high heat 5 to 7 minutes, stirring occasionally, until beef is thoroughly cooked; drain.
- Stir in remaining ingredients except cheese and corn chips. Heat to boiling; reduce heat. Simmer uncovered 5 to 10 minutes, stirring occasionally, until corn is tender. Top individual servings with cheese and corn chips.
| Print these coupons... | ||||||
| About Concordance™ | ||||||
Hope you enjoyed the game! I can not believe the weekend is already over. I did love the commericials though :)
Nite,
Serena
Thursday, February 3, 2011
DIY Thursday - Valentine's Mailboxes
Hi Everyone!!!
For those of you that might not know, I teach during the day. With Valentine's Day comes the need for valentine mailboxes. We all have used the traditional lunch sack or show box. But then I came across this...

SO CUTE RIGHT!!!!
Didn't The Crafting Chicks do a great job!!! I am in love!!!
OK...here are the directions. They are easy enough to make on a weekend, or a snowday for some of you guys getting hit hard with storms!


For those of you that might not know, I teach during the day. With Valentine's Day comes the need for valentine mailboxes. We all have used the traditional lunch sack or show box. But then I came across this...
SO CUTE RIGHT!!!!
Didn't The Crafting Chicks do a great job!!! I am in love!!!
OK...here are the directions. They are easy enough to make on a weekend, or a snowday for some of you guys getting hit hard with storms!
Ok as told by The Crafty Chicks....
All you need for to make these darling mailboxes are:
-A mini mailbox of some sort.
-Fun scrapbook paper. I wanted to use something that wasn’t really Valentiney so that I could use them all the time.
-A monogram or other supplies to add your childs name.
-Mod Podge
First, I traced and cut my paper to fit on my mailbox and each of the lids. The tricky part was cutting around the flag. I just kind- of measured where the flag would go and made a little notch. It doesn’t have to be perfect, the flag will cover some of it. 
Next, I used Mod Podge to stick my paper onto my mailbox and used Mod Podge on the areas with paper as well. Last, I added a cute little digi- scrapped tag with my little ones beautiful faces and names on it. I Mod Podged that on too. I added some ribbon on one of the lids and I was done.
Easy...yes. Adorable...yes. Want to make it this weekend...yes!!!
Enjoy and check out the entire post!
Nite,
Serena
Tuesday, February 1, 2011
Wine....I need wine!
Tonight, last night, all Sunday night I have been doing the same thing...trying to install and use my new sewing/embroidery machine. I does not look promising. I am SO FRUSTRATED!!!!!!!!!!! So I decided to take a break and share something that would make me feel so much better.
Two weeks ago, I had a dinner party for my family. We are trying to all hang out more, the adult cousins. Scary that we are the adults now?!?!? Anywho...I themed the night "Wine and Cheese" All the colors were mustard yellow and berry red and the food was all Italian. I did pasta bar ( remember from previous blog posting) and the desserts were beautiful and delish!
OK...so here are the pictures!!!


I worked with some amazing woman on this party!!! Thank you all for your gift and talents!!!!
Please check out their shops! I love everything on this table! Also, check out my new Wine and Cheese listing in ETSY!!!!
I hope you loved it!!!
Nite,
Serena
ps - don't forget the free Super Bowl Printables!!!
Two weeks ago, I had a dinner party for my family. We are trying to all hang out more, the adult cousins. Scary that we are the adults now?!?!? Anywho...I themed the night "Wine and Cheese" All the colors were mustard yellow and berry red and the food was all Italian. I did pasta bar ( remember from previous blog posting) and the desserts were beautiful and delish!
OK...so here are the pictures!!!


I worked with some amazing woman on this party!!! Thank you all for your gift and talents!!!!
Please check out their shops! I love everything on this table! Also, check out my new Wine and Cheese listing in ETSY!!!!
Cupcake Toppers – Lynlee Petite Cakes
Cake Pops – Boxed Pops
Cookies – The Cookie Jar
Cork Placecard Holders – Gallery 360
Party Printables and FavorBoxes – Rylie Boo Events
Banner, drink me tags and Twine – Pig Castle
Frame – Creative Flair Art
Bunting – Jaime Mancilla
I hope you loved it!!!
Nite,
Serena
ps - don't forget the free Super Bowl Printables!!!
Subscribe to:
Posts (Atom)